Pain in buttock… here is one possible cause


Visit our other blog at: Chiropractor in Woodbridge VA

Piriformis syndrome is a muscular disorder that can compress the sciatic nerve causing radicular symptoms into the buttock and along the course of the sciatic nerve.

When the piriformis muscle shortens or spasms due to trauma or overuse, it can compress or strangle the sciatic nerve beneath the muscle. Generally, conditions of this type are referred to as nerve entrapment or as entrapment .

Inactive gluteal muscles also facilitate development of the syndrome.  These are important in both hip extension and in aiding the piriformis in external rotation of the femur. A major cause for inactive gluteals is unwanted reciprocal inhibition from overactive hip flexors (psoas major, iliacus, and rectus femoris). This imbalance usually occurs where the hip flexors have been trained to be too short and tight, such as when someone sits with hips flexed, as in sitting all day at work. This deprives the gluteals of activation, and the synergists to the gluteals (hamstrings, adductor magnus, and piriformis) then have to perform extra roles they have not evolved to do. Resulting hypertrophy of the piriformis then produces the typical symptoms.

Overuse injury resulting in piriformis syndrome can result from activities performed in the sitting position that involves strenuous use of the legs as in rowing/sculling and bicycling.

Runners, bicyclists and other athletes engaging in forward-moving activities are particularly susceptible to developing piriformis syndrome if they do not engage in lateral stretching and strengthening exercises. When not balanced by lateral movement of the legs, repeated forward movements can lead to disproportionately weak hip abductors and tight adductors

Another cause for piriformis syndrome is stiffness, or hypomobility, of the sacroiliac joints. The resulting compensatory changes in gait would then result in shearing of one of the origins of the piriformis, and possibly some of the gluteal muscles as well, resulting not only in piriformis malfunction but in other low back pain syndromes as well.

Piriformis syndrome can also be caused by overpronation of the foot.[citation needed] When a foot overpronates it causes the knee to turn medially, causing the piriformis to activate to prevent over-rotating the knee. This causes the piriformis to become overused and therefore tight, eventually leading to piriformis syndrome.

How to properly adjust your office chair!

Chiropractor in Woodbridge VA, Blog

Visit our other blogs at chiropractorinwoodbridgeva.blogspot


The first step in setting up an office chair is to establish the desired height of the individual’s desk or workstation. This decision is determined primarily by the type of work to be done and by the height of the person using the office chair. The height of the desk or workstation itself can vary greatly and will require different positioning of the office chair, or a different type of ergonomic chair altogether.

Once the workstation has been situated, then the user can adjust the office chair according to his or her physical proportions. Here are the most important guidelines – distilled into a quick checklist – to help make sure that the office chair and work area are as comfortable as possible and will cause the least amount of stress to the spine:


Elbow measure

First, begin by sitting comfortably as close as possible to your desk so that your upper arms are parallel to your spine. Rest your hands on your work surface (e.g. desktop, computer keyboard). If your elbows are not at a 90-degree angle, adjust your office chair height either up or down.

Thigh measure

Check that you can easily slide your fingers under your thigh at the leading edge of the office chair. If it is too tight, you need to prop your feet up with an adjustable footrest. If you are unusually tall and there is more than a finger width between your thigh and the chair, you need to raise the desk or work surface so that you can raise the height of your office chair.

Calf measure

With your bottom pushed against the chair back, try to pass your clenched fist between the back of your calf and the front of your office chair. If you can’t do that easily, then the office chair is too deep. You will need to adjust the backrest forward, insert a low back support (such as a lumbar support cushion, a pillow or rolled up towel), or get a new office chair.

Low back support

Your bottom should be pressed against the back of your chair, and there should be a cushion that causes your lower back to arch slightly so that you don’t slump forward or slouch down in the chair as you tire over time. This low back support in the office chair is essential to minimize the load (strain) on your back. Never slump or slouch forward in the office chair, as that places extra stress on the structures in the low back, and in particular, on the lumbar discs.

Resting eye level

Close your eyes while sitting comfortably with your head facing forward. Slowly open your eyes. Your gaze should be aimed at the center of your computer screen. If your computer screen is higher or lower than your gaze, you need to either raise or lower it to reduce strain on the upper spine.

Armrest

Adjust the armrest of the office chair so that it just slightly lifts your arms at the shoulders. Use of an armrest on your office chair is important to take some of the strain off your upper spine and shoulders, and it should make you less likely to slouch forward in your chair.

How to strengthen your core!


Chiropractor in Woodbridge Va, Blog Visit our blog at:  http://chiropractorinwoodbridgeva.blogspot.com/

They say a strong core can help prevent low back pain…  well what is a core and how do you strengthen it?  Pretty easy to do and you don’t need a gym membership!

Situps/Crunch. Lie on your back on the floor or a yoga mat. Legs are straight on the floor, leg muscles tight, backs of the legs “glued” to the floor. Either do slides (sliding your hands on your legs) or cross your arms in front of you (putting your hands behind your head will pull your head up, resulting in your neck being strained). Engage your transverse abdominus to initiate the crunch/sit up. Keeping legs “glued” to the floor, come all the way up to sitting tall with a straight spine. To modify, keep knees bent, feet flat on the floor and procede as above. If you are not ready for full sit ups, do a crunch, holding your transverse abdominus in the whole time. Beginners start with 1-2 sets of 10-12 repetitions, intermediates perform 2-3 sets of 12-15 repetitions, advanced perform 3-5 sets of 15 repetitions holding a weighted medicine ball. If you are ready for a further challenge, do as many as you can. At the number you stop, mark that down somewhere so you don’t forget. Each time you exercise, increase the number of situps by increments of 3-5. Increasing the number slowly will help get your abs used to doing situps. This gives you the “six pack” and a strong core. Performing crunches on an unstable surface such as a stability ball will further challenge the core muscles.

Plank. Lie on the floor, or yoga mat, face down. Place forearms and toes on the floor, push up so only the forearms and toes remain on the floor. Tighten your hip, leg, arm, back, chest, and abdominal muscles making this a total body exercise. Keep your whole body straight from the base of the skull all the way to the heels, and keep even breathing. You’ll want to drop your hips a little bit further than shown here. After 30 seconds, relax for a few seconds. Then for another 30 seconds, lift yourself up again, but on your right side. Your right forearm and toes should be the only things touching the ground. Shoulders and hips will be stacked directly over one another. Feet can be separated or on top of one another. Hold for 30 seconds, rest, then switch to your left side. Repeat the whole cycle one to three more times. When 30 seconds is a breeze, increase the time by at least 5 seconds. The plank strengthens not only your core, but your total body,increasing core stability.

Arm sweep. Sit on the floor and slightly outstretch your legs “gluing” them to the floor, or bending the knees with feet flat. Sit tall, engaging your mid back to help you sit up straight. Stretch out your arms out the sides. Next, twist your body to the left so that you rotate and your right hand reaches for the left foot, and the left hand touches the ground behind you or is raised in the air behind you. Repeat on your right side. This results in a sweeping motion of your arms and twisting your body to engage the abdominal muscles and back muscles. Your fitness level determines the number of sets and reps you aim for. Beginners, 1-2 sets of 8-10 reps, intermediates, 2-3 sets of 12-15 reps, advanced, 3-5 sets of 15-30 reps.

Superman. Lie on the floor, or your yoga mat, face down. Reach your arms directly in front of you, reaching to the opposite wall. Straighten your legs, “gluing” your heels and inner thighs together by tightening the inner thighs and glutes. Lift your arms, chest, head, legs and feet off of the ground. At this point, only your belly and hips are touching the ground (no knees or feet). Keep holding your arms, chest, head, and legs up, engaging your low-mid back muscles and your glutes, for at least 30 seconds. Then relax. Do it again for another 30 seconds. When 30 seconds in simple, increase your time by 5 seconds or more. This exercise strengthens the back muscles that help support your spine and are necessary for a strong core.

Things to think about before you start an exercise program.

Chiropractor in Woodbridge Va, Blog

Visit our blog at:  http://chiropractorinwoodbridgeva.blogspot.com/

Before you start an exercise program, there are a few things your need to figure out:


Question Yourself

What are your goals?

Lose weight… Increase cardio performance…   But if you’re of a certain age or have certain cardiovascular risk factors, you may need to see your physician before beginning a program that involves vigorous (as opposed to moderate) aerobic activity.


Here’s how exercise intensities are typically defined:


Low-to-Moderate

Something you can do for about 60 minutes.  Usually included in the 60 minutes is a slow gradual warm up leading to brisk pace.


Vigorous

Name says it all.  Usually after 20 minutes of this type of exercises fatigue starts to set in.  Heart rate and breathing significantly increased.

Are you planning to participate in vigorous activities and are a man over 45 or a woman over 55? You should receive a medical exam first. The same is true for individuals of any age with two or more coronary artery disease risk factors. If you’re unsure if this applies to you, check with your physician.

Now the standard questions you need to ask yourself:

A “yes” to any one of the following questions means you should talk with your doctor, by phone or in person, before you start an exercise program. Explain which questions you answered ‘’yes’’ to and the activities you are planning to pursue.


Have you been told that you have a heart condition and should only participate in physical activity recommended by a doctor?

1  Do you feel pain (or discomfort) in your chest when you do physical activity? When you are not participating in physical activity? While at rest, do you frequently experience fast, irregular heartbeats or very slow beats?

2  Do you ever become dizzy and lose your balance, or lose consciousness? Have you fallen more than twice in the past year (no matter what the reason

3  Do you have a bone or joint problem that could worsen as a result of physical activity? Do you have pain in your legs or buttocks when you walk?

4  Do you take blood pressure or heart medications?

5  Do you have any cuts or wounds on your feet that don’t seem to heal?

6  Have you experienced unexplained weight loss in the past six months?

7  Are you aware of any reason why you should not participate in physical activity?

If you answered “no” to all of these questions, and you passed the first round of questions, you can be reasonably sure that you can safely take part in at least a moderate-intensity physical-activity program.


But again, if you are a man over 45 or a woman over 55 and want to exercise more vigorously, you should check with your physician before getting started.

Whiplash Information

Chiropractor in Woodbridge VA, Whiplash Information

Visit our blog at chiropractorinwoodbridgeva.blogspot.com


Whiplash is a widely use term to define any violent movement of the neck.  Usually associated with car accident but also can be from sports or falls.  Really anything that forces your head to violently move in any direction.   
What happens:

Whiplash injuries most often result in sprain-strain of the neck. The ligaments that help support, protect, and restrict excessive movement of the vertebrae are torn, which is called a sprain. The joints in the back of the spine, called the facet joints, are covered by ligaments called facet capsules, which seem to be particularly susceptible to whiplash injury.

In addition, the muscles and tendons are strained—stretched beyond their normal limits. The discs between the vertebrae, which are essentially ligaments, can be torn, potentially causing a disc herniation. The nerve roots between the vertebrae may also be stretched and become inflamed. Even though it is very rare, vertebrae can be fractured and/or dislocated in a whiplash injury.

What to look for:

The most common symptoms of whiplash are pain and stiffness in the neck. These symptoms are generally found in the areas that are “whiplashed.” For example, during a whiplash, first the head is lifted up from the upper-cervical spine. This creates a sprain/strain in the region just below the skull, where symptoms usually occur. Symptoms may also commonly be seen in the front and back of the neck. Turning the head often makes the pain and discomfort worse.

Headache, especially at the base of the skull, is also a common symptom, seen in more than two thirds of patients. These headaches may be one-sided (unilateral) or experienced on both sides (bilateral). In addition, the pain and stiffness may extend down into the shoulders and arms, upper back, and even the upper chest.

In addition to the musculoskeletal symptoms, some patients also experience dizziness, difficulty swallowing, nausea, and even blurred vision after a whiplash injury. While these symptoms are disconcerting, in most cases, they disappear within a relatively short time. If they persist, it is very important to inform your doctor that they are not resolving. Vertigo (the sensation of the room spinning) and ringing in the ears may also be seen. In addition, some patients may feel pain in the jaw. Others will even complain of irritability, fatigue, and difficulty concentrating. These symptoms also resolve quickly in most cases. In rare cases, symptoms can persist for weeks, months, or even years.

Another important and interesting aspect of whiplash is that the signs and symptoms often do not develop until 2 to 48 hours after the injury. This scenario is relatively common but not completely understood. Some speculate that it may be due to delayed muscle soreness, a condition seen in other circumstances.

Treatment:

Staying active

One of the most important aspects of whiplash management is for the patient to stay active, unless there is some serious injury that requires immobilization. Patients should not be afraid to move and be active, within reason. In addition, your doctor will often prescribe an exercise or stretching program. It is particularly important to follow this program as prescribed, so that you can achieve the best long-term benefits.

Chiropractic manipulation and physical therapy

Ice and/or heat are often used to help control pain and reduce the muscle spasm that results from whiplash injuries. Other physical therapy modalities, such as electrical stimulation and/or ultrasound, may provide some short-term relief. They should not, however, replace an active-care program of exercise and stretching. Spinal manipulation and/or mobilization provided by a chiropractor can also give relief in many cases of neck pain.

https://doroskichiropractic.com/

Things to look for in a possible head injury.

Chiropractor in Woodbridge VA,  Blog
Visit our blog at   http://chiropractorinwoodbridgeva.blogspot.com/

How to treat head injuries in children: At first glance, minor head injuries can seem worse than they really are, so don’t panic (even if it’s your first instinct). If you lose control, chances are your child will take his cue from you, think there’s something to worry about, and become hard to console. Instead, try your best to stay calm and do the following:
  • Heavy Bleeding, put a clean cloth or bandage on the wound first and apply direct pressure for several minutes. Keep in mind that cuts on the head and face bleed more than anywhere else because there are more blood vessels there, so don’t be alarmed if it looks gory! It doesn’t necessarily mean the cut is severe.
  • For minor cuts and scrapes on the face, gently rinse the area with mild soap and warm water, apply an antibacterial ointment, and cover it with a bandage.
  • Bumps and Lumps and your child doesn’t seem too upset, an ice pack (or a bag of frozen veggies, if that’s all you’ve got) is good for easing discomfort and reducing inflammation, as is ibuprofen (but only give your baby ibuprofen if he’s six months or older). And don’t forget the TLC!
When to call the doctor: You can treat most minor head injuries at home. But if your child has any of the following symptoms, call your pediatrician.
  • There is a gaping cut on your child’s face (this will often require stitches).
  • The bleeding doesn’t stop after five or ten minutes of applying pressure to the wound.
  • Your child is inconsolable and won’t stop crying.
  • Your child landed headfirst onto a hard surface.
What to do if you suspect your child has suffered a concussion: If your child has suffered a serious blow to his head or was knocked unconscious (even for a minute), he could have a concussion, which is a bruise to the brain. Call the doctor, who will probably recommend that you:
  • Keep your child awake for the first hour or so to make sure you get a clear sense of his mental well-being before he naps or goes to sleep for the night. You want to make sure your child isn’t dizzy or confused. For a baby, this could mean he’s crying and not acting like his usual self. A toddler or preschooler could lose his balance or complain that he can’t see.
  • Check on your child every couple of hours when he’s sleeping to get a look at his skin color and breathing pattern. If all appears normal, there’s no need to wake him. If he looks pale or his breathing seems irregular, rouse him gently. If he fusses and tries to go back to sleep, all is well. If you can’t wake him up, call 911.
  • Keep tabs on your child for the next 24 hours. Call the doctor or 911 if your little one exhibits any of these symptoms: vomiting, imbalance, confusion, listlessness, extreme irritability, changes in eating, sleeping, or breathing patterns, complaints of a headache, slurred speech, eye irregularities (such as enlarged pupils or crossed eyes), seizure, blood or fluid discharge from the nose, or a loss of consciousness.
How to prevent head injuries in children: There’s no surefire way to keep your wobbly baby or waddling toddler from taking a dive, but there are ways to reduce the likelihood of one. They include:
  • Never leave your baby or toddler alone on a high piece of furniture such as a bed, changing table, or high chair.
  • Always strap your child into the stroller and high chair or onto the changing table.
  • Keep “climbable” furniture away from windows so that your child can’t get to open windows (even if they have window guards).
  • Don’t use a baby walker since your child may fall out of it or fall down the stairs while using it.
  • Watch your toddler when he is playing outside, and stay within arm’s reach when he’s on a high surface.
  • If you have a play gym or swing set in your yard, cover the area under and around it with soft materials (like wood chips or rubber mulch) so if (or when!) your toddler tumbles, he will fall onto a softer surface.

Some ways to prevent Low Back injuries

Chiropractor in Woodbridge VA, Blog

Visit our blog at http://chiropractorinwoodbridgeva.blogspot.com/

Preventing back injuries is a major challenge for employers. According to the Bureau of Labor Statistics (BLS), more than one million workers suffer back injuries each year. Typically, back injuries account for one out of every five workplace injuries and illnesses, and one-fourth of all compensation indemnity claims are a result of back injuries. The pain and discomfort of back injuries can have a dramatic change in employee productivity.
A BLS survey shows that four out of five back injuries were to the lower back, and that three out of four occurred while lifting. This survey shows the importance of reducing back injuries caused by lifting. Although no approach has completely eliminated such injuries, a substantial portion could be prevented by incorporating an effective control program along with an ergonomics analysis and design of work tasks.
OSHA has evaluated ways to help prevent lifting injuries. They specify two types of controls: engineering and administrative.
Engineering controls are used to redesign the workstation to minimize lifting hazards. Administrative controls include carefully selecting and training workers, so that they can perform their jobs safely.
Suggested administrative controls include:
Strength testing of existing workers: Studies have shown strength testing can prevent up to one-third of all work-related injuries. Through the strength-testing process, employers can discourage employees from performing tasks that exceed their strength capacities.

Physical conditioning or stretching programs:
 These programs are implemented to reduce the risk of muscle strain.Training: Employees should be trained to utilize proper lifting techniques that place minimum stress on the lower back.
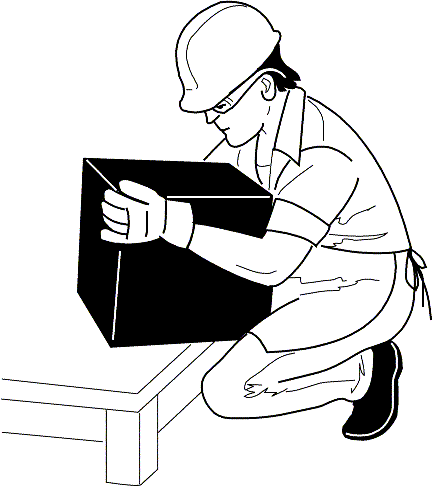
Before lifting, take a moment to think about what you are about to do. Examine the object for sharp corners, slippery spots or other potential hazards. Know your limit and do not try to exceed it. Ask for help if needed. Or if possible, divide the load to make it lighter. Know where you are going to set the item down and make sure the destination and your path are free of obstructions. Then follow these steps.
Figure A
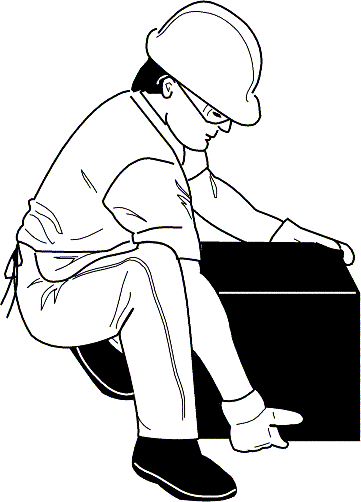
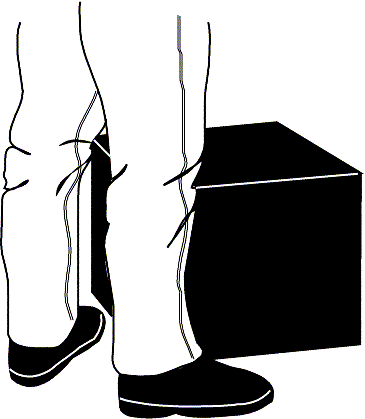
1. Stand close to the load with your feet spread shoulder width apart. One foot should be slightly in front of the other for balance.
Figure B
2. Squat down bending at the knees (not your waist). Tuck your chin while keeping your back as vertical as possible.
Figure C
3. Get a firm grasp of the object before beginning the lift.
Figure D
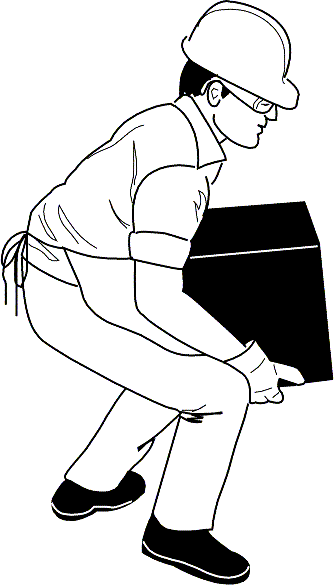
4. Slowly begin straightening your legs, lifting slowly. Never twist your body during this step.
Figure E
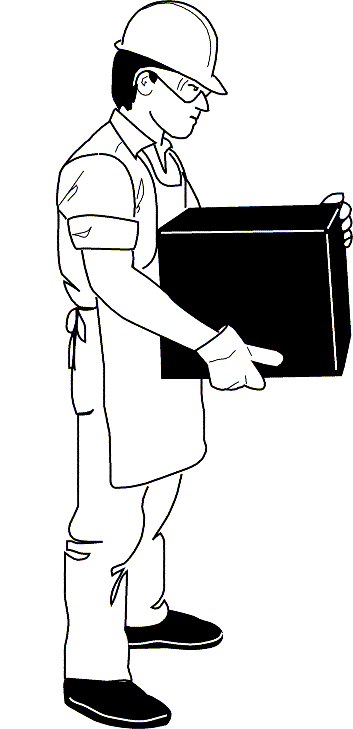
5. Once the lift is complete, keep the object as close to the body as possible. If the load’s center of gravity moves away from your body, there is a dramatic increase in stress to the lumbar region of the back.
If you must turn while carrying the load, turn using your feet, not your torso.
To place the object below the level of your waist, follow the same procedures in reverse order. Remember to keep your back as vertical as possible, and bend at the knees.
chiropractor in woodbridge va, blog